


Zoffen
-
Posts
447 -
Joined
-
Last visited
-
Days Won
3
Content Type
Profiles
Forums
Downloads
Store
eMastercam Wiki
Blogs
Gallery
Events
Posts posted by Zoffen
-
-
I'm not sure this will help with Ron's current situation here but i thought i would add this as it relates to the safety zone.
I have used the "stock" Tab in the operations manager to define a "safety" like zone using the rectangular stock option (i imagine you could use other shapes if you set it up correctly). I then customized my post, since all the data from those fields are available, to use this area for automatic 3+2 retracts. This took some heavy post customization but once i had it figure out i would define a box as a safe area and my post would automatically find the sphere the part will spin around in and automatically move it out of the way. This was on a Table/Table 5 axis(variaxis) so moving out of the way was a simple z move. It might be harder to implement in a head/head or other 5-axis style machine. This saved me SOOOOOO MUCH TIME as i didn't have to worry about retracts at an index move my post would do it all for me. Some of my programs were for fairly complex hydraulic manifolds with some over 500 ops with LOTS of indexing so this was a real lifesaver. Plus if you reorder the ops you don't have to think about retract and approach moves as they are all done AUTOMAGICALLY!
If anyone is interested i'll try and dig up how i did it. Hope this helps someone!
-
Still waiting for my boss to buy me this.......
https://www.overclockers.co.uk/mwelab-emperor-1510-gaming-workstation-chair-white-gc-000-mw.html

But for cereal a motorized standing/sitting desk is in my future! Sitting is so bad for you i'm surprised they haven't tried to tax it yet!!!
-
Off the top of my head:
Double check, then triple check.
Always ask for clarification even if it means asking again.
5% rapid and distance to go are your friend.
Don't over tighten bolts. Tight is good and tighter is not better!
Be clean and organized.
Fail forward, you will make mistakes.
As long as you bring the desire to learn and a good attitude to the table you will go far.
-
 2
2
-
-
That looks awesome! I've never tried this with MC but i want to now!
-
I agree to all points here it is frustrating getting them to do what you want sometimes.
I would like to see a graphical depth selection kinda like they use in NX. That is one thing i really liked about it when i got a demo.
Plus dragging things around on the screen makes for good demos!
This would give you easy and precise control of all the depths and stepups.
-
Yup tab order is some pretty basic stuff. LOW HANGING FRUIT
-
2
-
-
With a little work from Mastercam it could be a really powerful tool. Multi axis link solves most of the issues with plane changes.
Yes it is a shame. Seems to be the theme of mastercam. Get it 95% and then onto another amazing whizbangfeature!
-
ok lame.
I wish they spent a little more time on the machinsim side. It looks pretty powerful but not being able to customize it is a real PITA!
Thanks for the info!
-
I'v got my Mazak i-700 set up and have the basics working now i'm trying to really dial it in.
How do you get machine sim to process intermediary moves between toolpanes? It just jumps to the new start position at the correct rotary position.
It also tells me i have a z overtravel at startup but the move if definitely within the machine travels.
Is there any documentation for linking machine sim with a post? or any documentation at all for this part of the product?
The support for this part of mastercam sucks balls! Is this on purpose so you have to go through CNC software to get this feature set up properly?
-
1
-
-
Ya i'd look over on practical machinist and there are some threads where everyone loves the brothers....not sure why it couldn't continuously mill tho....
I've have heard very little bad and a whole lot of good about brother's.
If i had a choice of robodrill vs. brother i'd go brother all the way!
-
It doesn't work it kept freaking out the toolpath using them. That was my 1st thing to try. That was not giving me the desired results so I old schooled it.
Yes i tried and got to that point also. i got close with a tilt away with a limit on the tilt but for some reason the blend spline is all wonked up between cuts.....Other than that motion looks good. That what i love about mastercam there is always a way to get something done.
-
Any reason you can't use the collision strategies to have the toolpath angle away when the holder nears that surface. I love what you've done here but i'm wondering why we can't get it to work using the tilt away collision strategy?
-
1
-
-
Yes you can add them to the toolbar or right click in the operations manager and select mill toolpaths, they should all be there
-
1
-
-
Ha lol i was mistakinly using the nethook 3.0 from X8 in my project so i didn't see these new functions.
Thanks and sorry for being dumb!
-
Says i'm not authorized.... I have my account at mastercam.com but it says i'm not permitted to view that page....
-
Can i get an example file?
-
How would i add a shortcut on the ribbon to run a specific nethook?
Thanks!
-
Ya. Its really misleading when the level manager doesn't reflect the actual # of entities is there. Let me know what you find.
-
Ok so it deletes them from view but in the levels manager is says they are still there....not sure whats goin on here....
-
I'm trying to delete a solid on a certain level and it goes away visually but still is an entity when you analyze the screen and it still says there is entities in the levelmanager.
Heres a snippet:
SearchManager.SelectAllGeometryOnLevel(Level);
Mastercam.Database.Geometry[] Geo = SearchManager.GetSelectedGeometry();
foreach (Geometry g in Geo) {g.delete;}
Is there something else i have to do to delete entities from a level in a mastercam file?
Thanks!
-
1
-
-
One fun thing i have done is make a custom drilling macro for doing porting tools is a multi parameter drill combo cycle such as:
1. Drill to certain depth from finish depth with a R1 Speed and Feed
2. Now Drill with a "chipbreak style" cycle from here with Q peck and R2 Speed and Feed to a certain depth from finish depth. I usually do this where the seal area is starting to cut to get it not to ratsnest.
3. From here use F1 Feeds and Speeds to Depth with a Dwell if you want.
I use this for finishers mostly.
Set this up as a custom drill cycle in mastercam. Import operations for all of the cavities you use with your proven speeds and feeds and get good parts all the time everytime. I have done 1000's of these features with very few problems and very solid process stability. Add an M04 at a few thousand RPM to knock any chips off between holes. If the spindle accels/decels fast the g's will whip alot of the chips off of there if any get stuck.
HTH!
-
Make sure it has a M.2 slot in it so you can add one of these:
-
I have alot of the probing cycles set up as custom drill cycles. Even have my post setup to rapid around and protected position correctly between cycles and it all works on different planes too (5 axis)! I verify them in vericut and it works super slick. I havent looked much into the programming for probing in vericut as i don't like having two files and would rather have it all in mastercam.
Its pretty sweet to walk up to my machine. Place the stock in the approx position, cycle start, G10 to get you close, probe to get you exact, and off to the races with minimal manual effort!
-
One thing I do that really helps me go faster is have enter and delete on my mouse. I don't need to move my hands most of the time for geometry selection or when I delete entities. I know it isn't a Mastercam specific tip but it really helps.
This is the single greatest thing i have done to CAD setup. I have it set up so middle wheel push left = delet, middle wheel push right = enter
This saves me soooo much time!
The only downside is for some reason vericut uses the spacebar to accept stuff instead of enter!!!

Simple way to create REF points?
in Industrial Forum
Posted
Yup. Mostly i just defined the stock box as my actual stock in my 5 axis vice and that turned out to be a good safety zone for the program with very efficient rapid moves.
I even had logic to determine different clearance zone z heights depending on where the rotaries were acutally at.
Example: a move from A0 C0. to A-90 C0 required less height than from A0 C0. to A-90 C90 if the part was a more rectangular then cubed. I programmed alot of 12"L x 6"W x 6"T ish workpeices so this did save some extra time not having to go all the way up as it would if i spun it around the long side. I hope that makes sense.
Typical Part: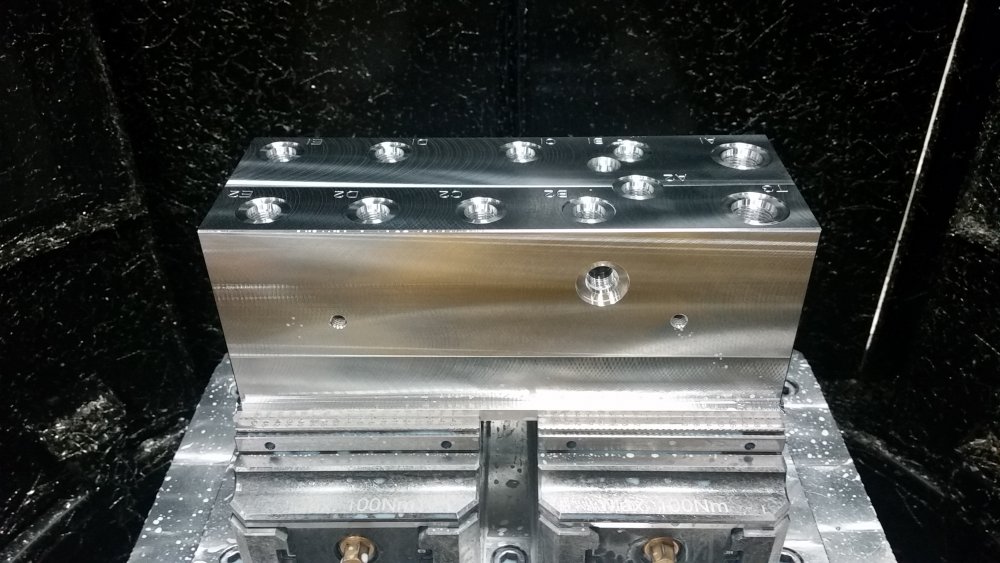
I had a switch in the post to control the output of rapid positioning combinations. But, it was 99% of the time set to Z+(Clearance Move to safety Z) --> XYAC --> Z-(back down to part)
This seemed to work very well for the setup and parts that we ran on that machine.